How Long Should You Bloom Drip Coffee? Start With 30 Seconds
How Long Should You Bloom Drip Coffee? Start With 30 Seconds
When hand-drip coffee tastes inconsistent, the bloom time is often worth reconsidering. This guide breaks down the differences between 20, 30, 40, and 60 seconds from a practical perspective—useful for beginners wondering how long to bloom and for those seeking finer control over acidity, sweetness, and body.
When hand-drip coffee tastes inconsistent, the bloom time is often worth reconsidering. This guide breaks down the differences between 20, 30, 40, and 60 seconds from a practical perspective—useful for beginners wondering how long to bloom and for those seeking finer control over acidity, sweetness, and body in Japan and beyond.
Around 30 seconds works as your baseline; shorter pulls out lightness, longer develops body and aftertaste. Building on a core recipe of 15g beans, 240ml water, 92°C temperature, and 30–45ml bloom water, this breakdown covers how to adjust for bean freshness, roast level, and dripper type—whether you're using a V60 or Kalita Wave.
From my own experience, I've found that light roasts bloom well at 30 seconds, medium roasts at 30–40 seconds, and milk-based drinks lean toward 60 seconds, with noticeable shifts in sweetness balance and aftertaste length. Rather than hunting for a single "correct" number, the goal is to learn what bloom time works for your taste, so you can dial in the cup you want.
How Long to Bloom Drip Coffee? 30 Seconds is the Standard Baseline
If you had to pick one reference point, 30 seconds is it. Within Japan, sources like C COFFEE typically use 30 seconds as the baseline, while many guides suggest 20–30 seconds, and Western sources often start at 30–45 seconds. C COFFEE's approach to 30-second bloom and the Breville guide recommending 30–45 seconds show surprising alignment. The reason 30 seconds has endured widely is that it balances reproducibility with flavor coherence—a sweet spot for most brewers.
How flavor changes across different bloom times
Around 20 seconds keeps the cup light and clean. The aroma blooms bright and snappy, and front-end flavors come through clearly. However, the sweetness depth and aftertaste richness tend to be muted. This timing can showcase the liveliness of light roasts beautifully, but some beans may feel thin, or acidity can dominate before sweetness registers.
Around 30 seconds is the easiest zone for balance. Aroma, sweetness, and mouthfeel flow naturally together, and it's hard to miss the mark even as a beginner. With a home recipe of 15g and 240ml total, the math is clean—roughly 2.5 minutes of pouring after a 30-second bloom reaches about 3 minutes total. This time architecture is why 30 seconds scales so well across different brewers and bean types.
Around 40 seconds is sometimes adopted as a standard recipe in specialty shops. In side-by-side comparisons, 40 seconds serves as a middle ground between extremes. When I brew the same bean, grind, and temperature at both 30 and 40 seconds, the 40-second cup often feels like the sweetness settles more calmly, and the flavor locks into a tighter whole. If you prefer coherence over flash, this 10-second step matters.
Around 60 seconds extends body, depth, and finish length noticeably. The coffee sits heavier on the tongue and resists being overshadowed by milk. But longer isn't always better—some beans develop a blunt, muddy finish instead of clean depth. Espresso-style milk drinks can benefit here, yet straight shots may feel overextended.
Using 30 seconds as the pivot point: when to shift toward 40 or 60
In practice, think of 30 seconds as the center, then adjust outward rather than chasing a single "right" answer. Fresh-roasted beans with abundant CO2 sometimes won't let water in smoothly at 30 seconds; pushing to 40 or 60 can help them settle. Conversely, older or lighter-roast beans sometimes shine brighter in the 20-second range.
Equipment matters too. A HARIO V60's high control sensitivity means a shift from 30 to 40 seconds is unmistakable in the cup. A Kalita Wave, with its more stable flow, often shows body develop cleanly at 40 seconds. Same beans, same water, same grind—yet the equipment's geometry alone shifts where the bloom time feels "right."
TIP
If you're unsure, use 30 seconds as your anchor. Go shorter (toward 20) for lightness, longer (toward 40) for roundness and sweetness, or longer still (toward 60) for body and finish. This mental map keeps your adjustments from drifting.
Comparison tests like "20 vs. 40 vs. 60 seconds" consistently show that shorter blooms favor the front of the flavor spectrum and longer blooms emphasize the finish. In other words, the best bloom time is not fixed; instead, treat 30 seconds as the global baseline while choosing 40 or 60 based on intent. Coffee is both science and hobby—the answer lives in the cup, not the recipe notebook.
How does bloom time affect the flavor of coffee? Hand-drip edition - THE COFFEESHOP
Specialty coffee wisdom says that bean quality determines most of the flavor profile, but extraction technique also shapes the cup. Hand-drip, especially, is prone to variability. The ratio and timing of water pours can shift the final coffee's character.
thecoffeeshop.jpWhy is bloom necessary? Releasing CO2 and ensuring even extraction
Bloom isn't just for show. The primary role is to release dissolved CO2 trapped in the beans after roasting, so water can wet the grounds evenly. As UCC's explanation of bloom notes, trapped gas creates barriers. Water struggles to penetrate uniformly, leaving some grounds over-extracted while others stay under-extracted.
This unevenness is the root of taste inconsistency. Some grounds release too many solvents; others release too few. The result can be a cup where acidity bites sharp and alone, or where the finish feels inexplicably heavy. Bloom is the stage where you level the playing field—a small initial pour that lets you degas and pre-wet uniformly before the main extraction begins.
When you brew fresh beans, you'll often hear a faint "whoosh" as gas escapes during bloom. I notice that newer beans lift the grounds visibly and push back against the water, while slightly aged beans expand more modestly. Yet appearance alone doesn't predict quality. Older beans bloomed thoroughly will still extract stably and taste balanced afterward.
Surface appearance matters less than even saturation
A common beginner worry: "My grounds didn't puff up much—did I fail?" The bloom's success isn't about how tall the mound gets; it's about whether all the grounds are uniformly wet. THE COFFEESHOP's essay on bloom effect emphasizes this: visual drama matters less than ensuring every grain has contact with water.
A large mound with water only hitting the center is a failed bloom. A modest rise with saturation across the surface is a successful one. Judge bloom success by asking, "Is any patch of ground still visibly dry?" If the surface looks uniformly dark and moist, water has likely traveled where it needs to. Dry patches or bright patches mean water is taking shortcuts—a sign you need a gentler, wider pour.
TIP
Watch for absence of dry spots, not dome height. If one area of the surface looks lighter in color, water hasn't penetrated evenly yet.
Once this foundation is set, water flowing through grounds in the main pour won't rush down a single path. Instead, liquid is more likely to move uniformly through the bed, so sweetness, acidity, and body emerge as a coherent whole rather than as isolated flavors. Bloom is brief, but its role in flavor coherence is outsized. The reason 30 seconds matters is precisely because it gives CO2 time to escape and the whole bed time to become uniformly damp.
Why doesn't my coffee bloom? Understanding the purpose, method, and optimal timing of bloom - THE COFFEESHOP
"Bloom" serves as a preparatory step in hand-drip coffee. When CO2 remains trapped in the grounds, it blocks water penetration, leading to uneven extraction.
thecoffeeshop.jpFlavor profiles: 20 vs. 30 vs. 40 vs. 60 seconds side-by-side
20 seconds: clean and flavor-forward
A 20-second bloom lightens the cup noticeably. Aroma jumps out bright and snappy; fruity or floral notes hit you first, and the opening feels lively. But sweetness depth and aftertaste richness stay muted. This works beautifully for light roasts served straight, letting their delicate character shine cleanly.
The trade-off: some beans taste thin, or acidity jumps out before sweetness arrives. Straight coffee benefits from 20 seconds' clean drop-off, but a milk drink will struggle—the coffee gets buried. This is a straight-coffee setup.
30 seconds: most versatile, balances sweetness, aroma, and finish
Thirty seconds remains the easiest zone. In any "0 vs. 30 vs. 60 second" test, 30 holds aroma, sweetness, and acidity in natural proportion. No single element shouts; instead, aroma's brightness, mouthfeel's smoothness, and the finish's length flow together unselfconsciously.
Home brewing is easiest here too. With 15g beans and 240ml total, bloom water (30–45ml) scales naturally, and the remaining ~2.5 minutes of pours lands you at ~3 minutes total extraction. Start here if you're unsure; you rarely miss badly. I often use 30 seconds as my baseline to read a bean's character before adjusting further.
What is coffee bloom and why do we need it? - Yama to Kawa Coffee Shop, Nagano City
Blooming serves several purposes in hand-drip coffee preparation. Understanding these helps you brew more consistently.
yamatokawa.com40 seconds: calmer sweetness, tighter coherence
At 40 seconds, sweetness settles more gracefully, and flavors lock into a tighter whole. Specialty shops sometimes adopt 40 seconds as their standard recipe. It occupies a true middle ground: lighter than 60 but riper than 20. It's stable enough to adopt as a house standard.
Side-by-side, a 40-second cup often shows sweetness arriving less aggressively than at 30 seconds, with rounder mouthfeel. Medium roasts especially benefit—you get the acidity still, but wrapped in body. V60 lets you keep lightness if you pour gently, while Kalita Wave's 40-second cup often carries a natural fullness. For both straight and milk drinks, 40 seconds is your next move if 30 feels a touch lean.
60 seconds: body, intensity, aftertaste—and risk of muddle
Extending to 60 seconds clearly deepens body and finish. The center of gravity shifts lower; you get chocolate, earth, and lingering sweetness. Milk drinks especially benefit—the coffee doesn't vanish into the liquid. And I do notice the aftertaste stretches.
But straight coffee often feels overextended here. A muddy, blunt finish instead of clean depth can emerge. Sixty seconds is potent—it straddles the line between "rich" and "heavy." Use it when you're pairing with milk or when you want a deep, roasted character, but understand it carries risk. Lighter roasts and delicate beans usually don't belong here.
TIP
Quick mental shorthand: 20 = light, 30 = baseline, 40 = rounded, 60 = deep. Straight drinks often live at 30–40. Milk drinks lean toward 60.
Core recipe: 15g beans, bloom 30–45ml for 30 seconds
Here's a single baseline recipe to build around:
- Beans: 15g
- Grind: medium (size of granulated sugar)
- Total water: 240ml
- Water temperature: 92°C
- Total brew time: 3:00–3:30
Bloom water: 30–45ml over 30 seconds. A rough rule: roughly 2x the bean weight (15g → 30ml) or ~20% of total water (240ml → ~48ml). Home brewers typically find 30–45ml easiest to control, which is why this range appears in brewing literature so often.
From here, taste shifts become clear. 20 seconds reads lighter and front-flavored. Thirty seconds balances. Forty seconds delivers standard-recipe stability. Sixty seconds pushes depth while risking muddiness. Brew the same bean at these four times, change nothing else, and you'll see your preference click into place.
Step 1: Preheat dripper and rinse filter
Warm the dripper, server, and filter thoroughly. Cold equipment kills the 92°C water's momentum in the early stages, muting flavor development. Pour water through the filter, empty the server, add 15g grounds, and level the surface lightly.
On water temperature: 92°C is a solid baseline. The practical range is 90–96°C, which aligns with Breville's bloom guide. Some brewers dial down a few degrees for dark roasts. If roast degree interests you, our coffee roast level guide ties roast to water temperature nicely.
Bloom time coffee: Things to know
Discover the art of bloom time coffee and how it transforms your brew. Learn why blooming matters and how to perfect the
breville.comStep 2: Bloom with 30–45ml for 30 seconds
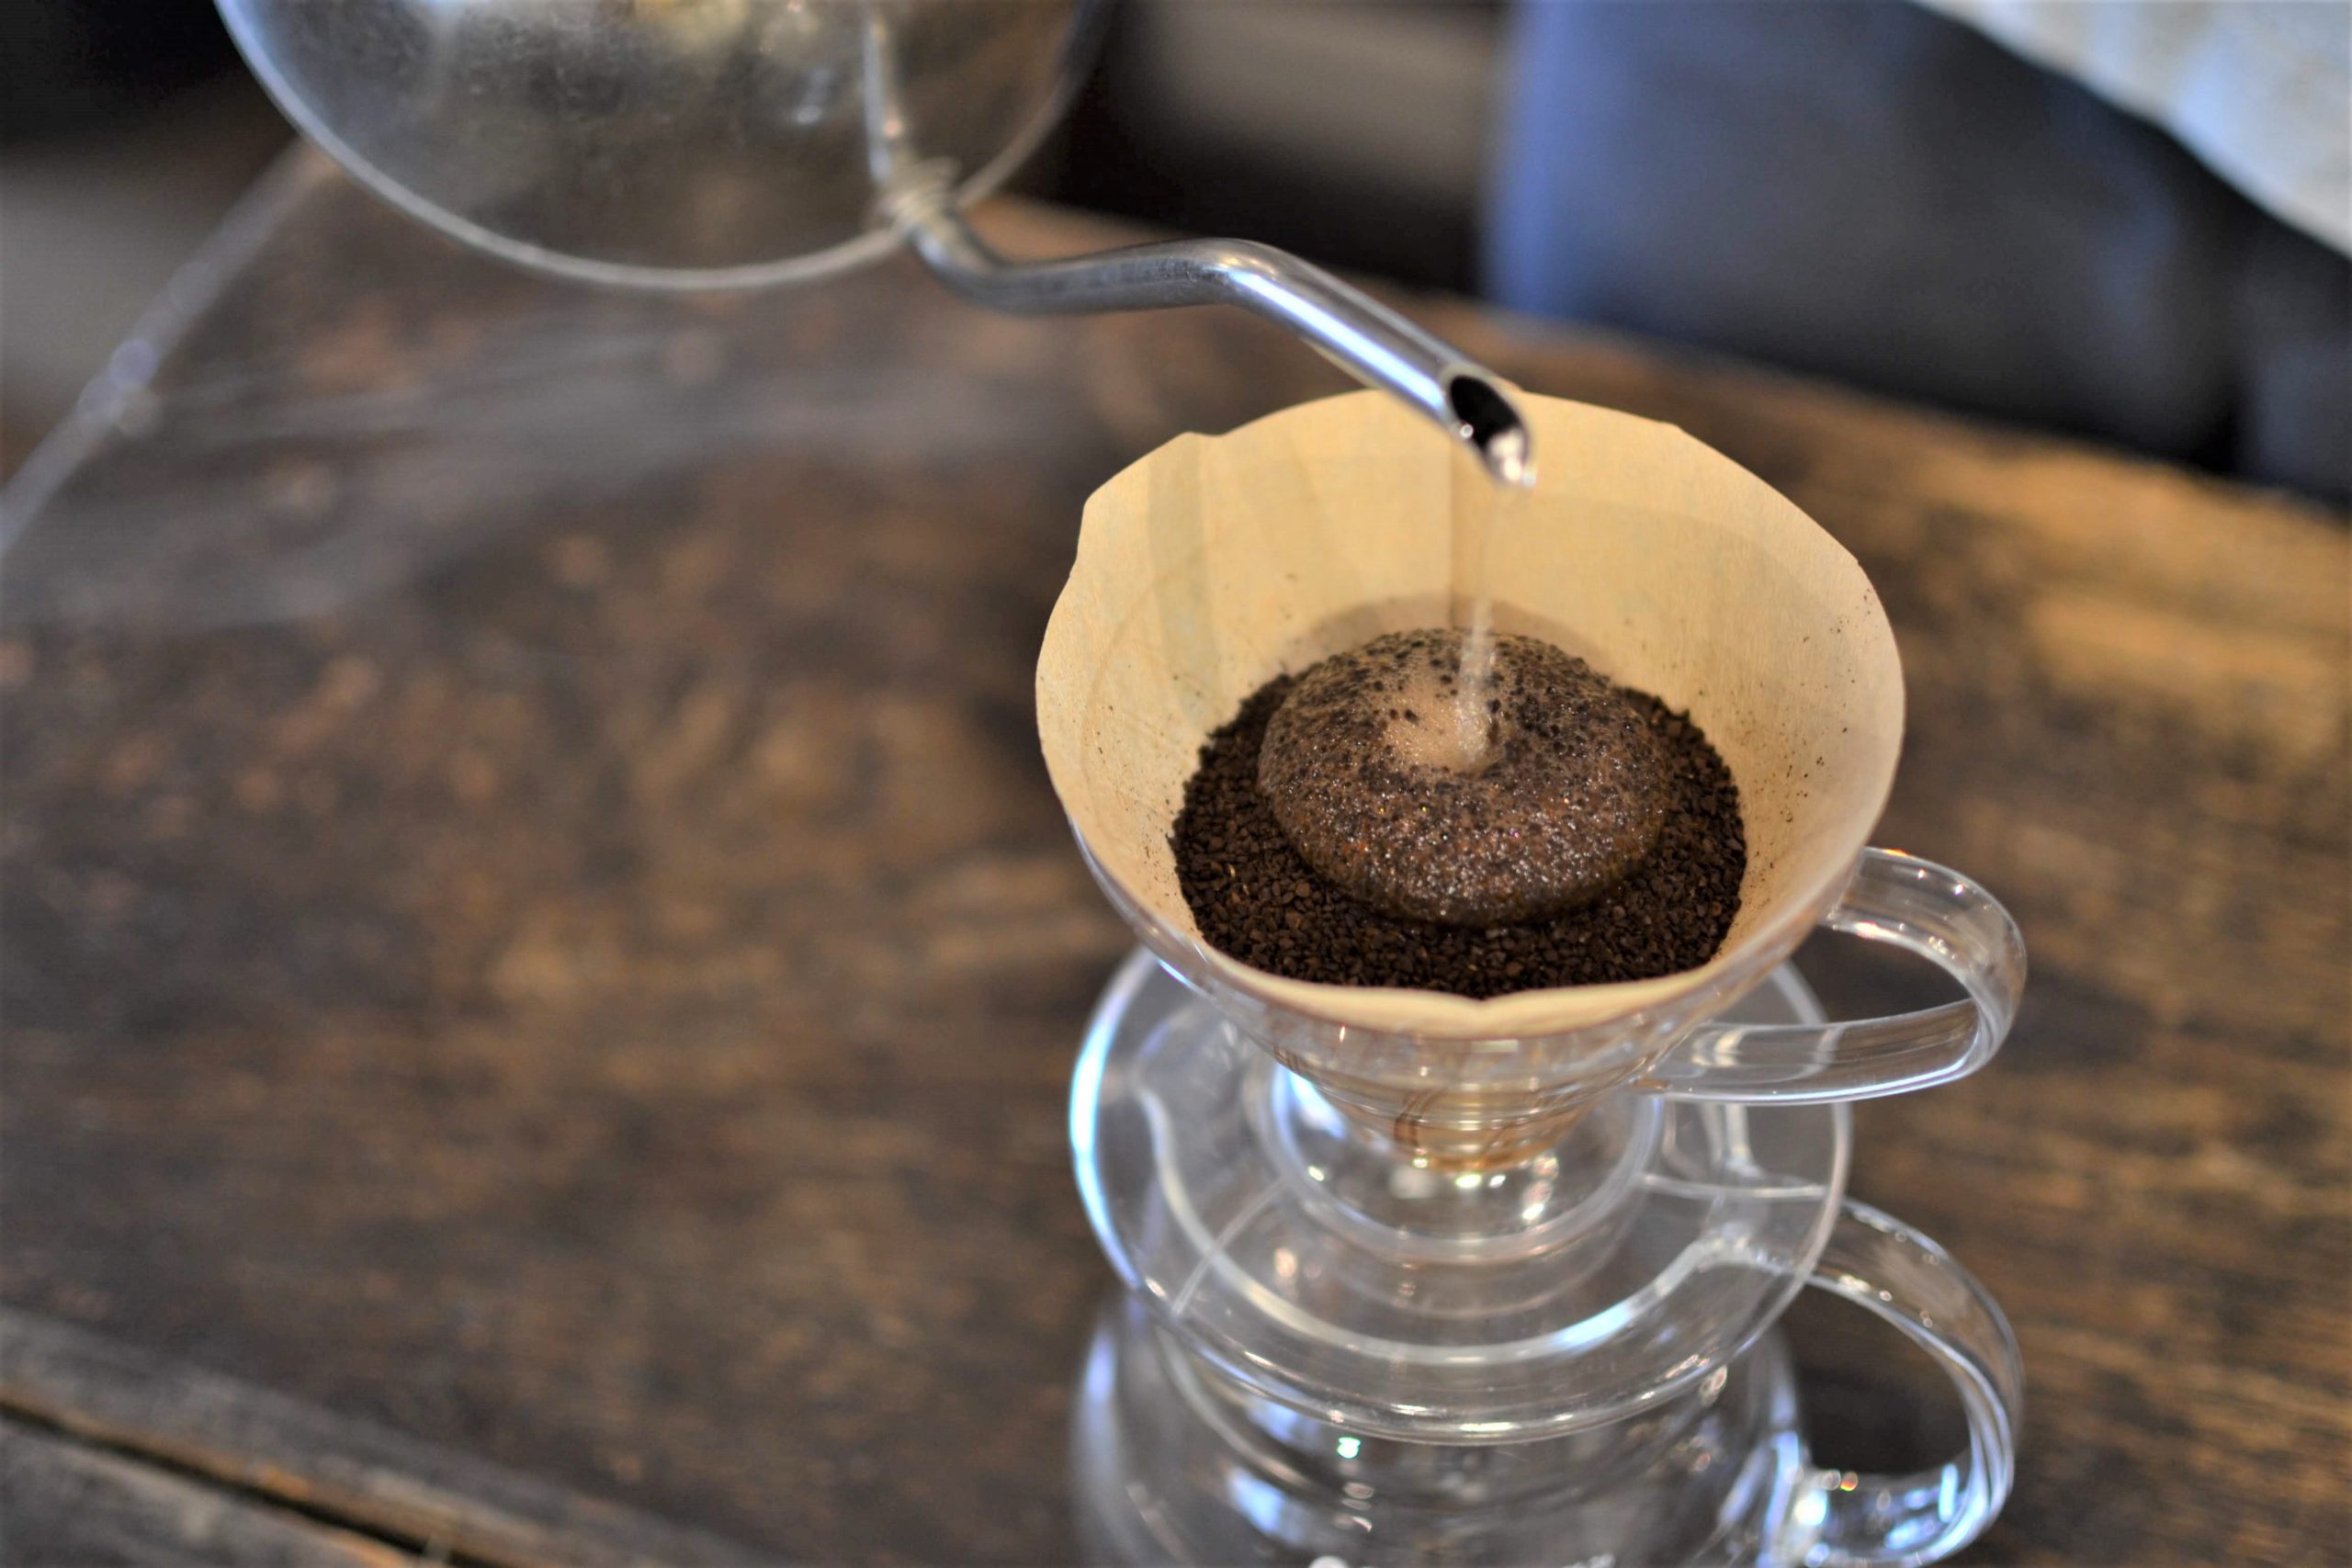
Pour gently from the center outward in a thin spiral. Aim for 30–45ml. The goal is even saturation, not a dramatic mound. If you pour hard down the middle, edges stay dry—that's a failed bloom. A gentle spiral, center-to-edge and back, dampens everything uniformly.
Wait 30 seconds. At 20 seconds, the cup tastes light and bright. At 40 seconds, flavors settle and standardize. At 60 seconds, depth arrives with muddle risk. I've noticed that changing bloom water from 20ml to 40ml alone shifts how the aromatics open in the cup and how stably the grounds flow afterward. Bloom is as much about uniform saturation as about time.
TIP
30ml = minimum to wet everything. 45ml = generous saturation. Start at 30ml; if grounds still look dry after the bloom, shift to 45ml next time.
Step 3: Pour remaining water in 2–3 passes to 240ml total
Once bloom time is up, add the remaining ~210ml in 2–3 pours, reaching 240ml total by the end. Don't pour in one aggressive flood; instead, keep a gentle rhythm and watch the water level. Total brew time should land in the 3:00–3:30 window—this prevents thinness and muddiness alike.
A 30-second bloom leaves ~2:30 for the remaining pours. Two pours sharpen definition; three pours keep flow calm and sweetness intact. V60 responds vividly to pour technique, letting you steer from light to balanced easily. Kalita Wave steadies the hand and produces natural body. Both benefit from this core recipe—it's flexible enough to work with different styles while stable enough to build on.
Bloom time choices slot into this framework cleanly. Twenty seconds leans the cup forward. Thirty grounds it. Forty rounds it. Sixty deepens it. Same recipe, different bloom—this is where hand-drip's magic lives, where math meets intuition.
Bloom timing depends on: bean freshness, roast, and dripper
Freshness matters: fresh-roasted vs. stable vs. aged
Bloom strategy shifts with bean age. Fresh-roasted beans carry abundant CO2. Pour water on them and they fight back—even if they puff up visibly, water may not have penetrated evenly. Pushing the bloom toward 40–60 seconds often helps; I've found that extending from 30 to 40 seconds on a 3-day-old light roast quiets the acidity and gels the sweetness noticeably.
Mid-stage beans (a week or two old) hit the sweet spot. Bloom at 30 seconds, then adjust by taste. Freshness drops off, gas pressure declines, and water wets more readily. This is the "play nice" zone—adjust off 30 seconds based on flavor, not desperation.
Older beans have degassed substantially. They wet easily, and water doesn't need coaxing. 20–30 seconds often suits them well. A long bloom can over-extract and muddy the cup. Keep it brief, then watch the pour closely—you have more control.
The rough rule: high freshness = longer bloom; low freshness = shorter bloom. Fresh = 40–60 range. Mid-age = 30 baseline. Old = 20–30 range.
Roast level: light, medium, dark
Light roasts brighten easily but can taste thin if bloom is too short. The acidity leads, and sweetness hides. A baseline to slightly long bloom (30–40 seconds) helps—you keep the brightness but thread in sweetness. Light roasts answer well to gentle adjustment; they don't hide much.
Medium roasts are the chameleon. Bloom timing doesn't feel critical; 30 seconds is genuinely neutral. Shorten it and you get liveliness; lengthen it and you get roundness. This is where you see bloom's effect most clearly, so test medium roasts at 30 vs. 40 seconds to feel the difference.
Dark roasts extract quickly and can become heavy or bitter if overextended. Counter-intuitive as it sounds, a shorter bloom + lower temperature often works better than "long bloom because dark roast." Dark roasts already have concentrated flavor; your job is refinement, not extraction. A 30-second bloom with 88°C water might outshine a 50-second bloom with 94°C water. Roast level and bloom time don't live in isolation—they're part of one equation.
TIP
Heuristic: fresh = extend bloom; aged = shorten bloom. Light = standard-to-long; medium = standard; dark = standard-to-short (with lower temps). These rough vectors give you a starting move before tasting.
Dripper behavior: V60, Kalita Wave, Chemex
HARIO V60 is pour-sensitive. The bloom's role is to set up; the pour afterward steers the cup. A 30-second bloom locks in baseline, then you can push light or round via pour technique. Testing 30 vs. 40 seconds on V60 often shows a clear shift because the dripper doesn't smooth out differences—it amplifies them. This responsiveness is useful for learning.
Kalita Wave is steadier. The wavy bottom and restricted exit create a natural buffer. At 40 seconds, the Wave often produces a thicker, rounder cup than a V60 would. Same beans, same bloom—but the equipment's geometry adds body. If you're aiming for deep flavor, Kalita Wave's 40 seconds carries a natural richness that V60's feels leaner.
Chemex appears in Western guides at 30–45 seconds, but quantitative side-by-side data (how Chemex at 30 differs from Chemex at 60) is scarcer. Chemex is designed for clarity; standard practice stays conservative. My intuition is that Chemex leans toward the 30–40 range, but I'll defer to direct testing rather than assume.
The broader point: equipment geometry changes how bloom feels. Same beans, same bloom time, different dripper—noticeably different cups. This isn't a flaw; it's the reason brew guides diverge. Understand your equipment's baseline (V60 = lively, Wave = full, Chemex = clear) and bloom times sync more smoothly.
Common mistakes and fixes: won't bloom, tastes sour, bitter, thin
New brewers often fixate on whether the grounds mound up. Stop. A tall dome without even saturation is a failed bloom; a modest rise with uniform dampness is a success. THE COFFEESHOP's write-up confirms this—the visual isn't the goal; the saturation is.
I've brewed cups that barely puffed but tasted wonderfully balanced, and cups that billowed yet came out thin because water had channeled through the center. Bloom is setup, not show. Judge it on whether the next extraction will be even, not on how tall the mound climbs.
Symptom checklist: sour / bitter / thin / heavy
If your cup tastes sharp and sour, try extending bloom by ~10 seconds and raising water temperature by 2–3°C. Often that settles things. If bitter or heavy dominates, shorten bloom by ~10 seconds, lower temperature by 2–3°C, and grind slightly coarser. (Exact impact varies with beans and grinder, but these vectors usually work.)
Watch for a strange combo: thin but heavy. This usually means the back-end extraction dragged too long—you underextracted early (thin) but over-extracted late (heavy). The cure isn't bloom alone; it's total time. Keeping total brew under 3:30 helps, and bloom is just the first piece.
TIP
Adjust in small steps: ±10 seconds bloom, ±1 grind notch, ±2–3°C temperature. Tweaking one variable at a time lets you see cause and effect. If bloom alone doesn't fix it, layer in grind or temperature adjustments.
Troubleshooting order: bloom → grind → temperature → pour rate
First, adjust bloom time. It shapes the entire extraction. Short bloom → light, front-flavored cup. Long bloom → deeper, less sour. A ±10-second shift often clarifies the problem.
Next, adjust grind. If bloom is dialed but the cup still tastes thin, you're probably grinding too coarse and water is running through too fast. Grind one notch finer. If it tastes bitter and heavy, grind one notch coarser.
Then, adjust temperature. Sour cup? Raise 2–3°C. Bitter cup? Lower 2–3°C. Temperature has outsized effect, so move it last, after bloom and grind are in the right ballpark.
Finally, adjust pour rate if timing is off. If total brew overshoots 3:30, your pours were too thin. If it undershoots 3:00, your pours were too aggressive. Tighten this last once the first three are settled.
This order keeps you from chasing ghosts. Bloom sets the stage; everything else fine-tunes. Often, a 30-second bloom + medium grind + 92°C water does 80% of the work.
Quick reference: bloom time by taste goal
Flavor profiles: clean / balanced / full-bodied
Forget complexity. Three target tastes, three bloom ranges:
| Goal | Bloom time | Notes |
|---|---|---|
| Clean & light | 20–30 sec | Front-end aroma bright, finish short; good for light roasts straight |
| Balanced | 30–40 sec | Sweetness, aroma, finish all present; safest middle ground |
| Full-bodied | 45–60 sec | Deep, heavy finish; pairs well with milk; risks muddle |
"Clean" (20–30 seconds): Aroma pops brightly, mouthfeel is light, finish is short. Perfect for a delicate single-origin served straight. The downside: some beans taste thin. A 30-second bloom gives you a touch more grip than 20 seconds while staying nimble.
"Balanced" (30–40 seconds): This is the Goldilocks zone. Sweetness and aroma feel natural, finish has presence but doesn't dominate. A 40-second cup often feels subtly rounder than 30 seconds—still balanced, just softer. This is where food pairing works best too; the cup doesn't clash with much.
"Full-bodied" (45–60 seconds): Intensity, lingering finish, chocolate/earth notes. Pour milk in and the coffee doesn't fade. Sixty seconds is the deep end—you're chasing body and mouthfeel, though muddle lurks. Forty-five seconds is the cautious entry point here; extend further only if you're chasing a specific milk-drink result.
TIP
Morning (light & alert): 30 sec. Midday (balanced & steady): 40 sec. Milk drink (full & present): 60 sec.** These three slots cover most daily scenarios. Pick the slot, then fine-tune ±5 seconds based on bean freshness.
Bean and equipment adjustments
This quick reference is a starting menu, not gospel. Fresh beans + light roast = shift toward 40 sec. The extra CO2 and delicate flavor need a gentler unfold. Aged beans + dark roast = shift toward 20 sec. They're eager to extract; don't push them.
On equipment: V60 lets you play within the bloom time you pick; its pour sensitivity is your control dial. Kalita Wave adds body regardless; if you're aiming for light, dial the bloom down slightly. Chemex wants clarity, so lean conservative—30 to 40 seconds, not farther.
The rule isn't "30 seconds is always right." The rule is "30 seconds is your launch pad, and you adjust from there based on freshness, roast, and intent." The difference between a tight, bright 20-second pour and a round, present 40-second pour is small in time but huge in the cup. That's the magic of the bloom.
Your next steps: tasting plan and how to log results
STEP 1: Brew your baseline
Fix your conditions: 15g beans, 240ml water, 92°C, medium grind, 30ml bloom water, 30 seconds bloom. Don't chase perfection yet—chase reproducibility. Can you make the exact same cup twice? Once you can, comparisons become meaningful.
Wet the grounds gently, all the way across. Thirty ml = "get everything wet." Forty-five ml = "soak it." Pick one, nail it, then move on. Stability beats flavor right now.
STEP 2: Compare 30 vs. 40 seconds
Keep everything constant except bloom time. Brew the same beans at 30 seconds, then at 40 seconds. Note five things: acidity, sweetness, body, aroma, finish.
Example log:
- 30 sec: Acidity bright, sweetness light, body thin, aroma floral, finish short.
- 40 sec: Acidity calm, sweetness rounder, body fuller, aroma warm, finish longer.
You don't need numbers. Words matter more. After three such comparisons (three different beans), your instinct hardens fast.
STEP 3: Don't jump to 60 seconds yet
If 40 seconds tastes thin to you, don't immediately try 60. Instead, fine-tune with grind or temperature. Grind one notch finer, or raise water temperature by 2°C. These moves add depth more surgically than extending bloom by 20 seconds, which can introduce muddle.
STEP 4: Account for bean age
Once the 30/40 comparison clicks, revisit with fresh-roasted beans. You'll likely want to push bloom toward 40–60 seconds because gas pressure is high. With aged beans, the sweet spot might drop to 20–30 seconds. Log the bean's roast date alongside your notes—patterns emerge fast.
GOAT STORY's write-up on 45-second bloom offers another school of thought: using ~20% of total water and waiting 45–60 seconds. Different starting point, but the logic is sound for milk-drink and body-forward brews.
Three log entries and a pattern emerges. You'll stop guessing.
Why is coffee bloom necessary? Explanation of the bloom and optimal bloom time - Goat Story
goat-story.jpSummary
The bloom's right answer isn't fixed—it's finding your baseline and knowing how to shift it. Start at 30 seconds with 15g beans in a standard recipe. Taste 20, 30, 40, and 60 seconds side-by-side to feel where lightness, balance, and depth live. Adjust for bean freshness, roast level, and your dripper's style. Watch for even saturation across the grounds, not visual drama.
If you're building a single system: I start at 30 seconds, then test 40 seconds. Those two steps alone stabilize the cup massively. From there, minor tweaks to grind and temperature keep me in the zone I want. Bloom is the foundation—nail it, and the rest of hand-drip becomes legible.
Related Articles
How to Make Iced Coffee Compared|Quick-Chill, Cold Brew, and Ice Drip Methods
Once you grasp the differences between quick-chill, cold brew, and ice drip methods, iced coffee becomes far less confusing. Whether you prioritize brightness and aroma, prefer soft sweetness, or want to savor the extraction process itself, your choice of method will shape the entire experience—and we'll walk you through each one with reproducible recipes and troubleshooting tips for making iced coffee in Japan.
Hand-Drip Coffee: Master the Basics with a Simple Recipe and Pro Tips
When hand-drip brewing feels unstable, pinning down your numbers before relying on intuition is the fastest path to improvement. This guide, designed for beginners wanting to recreate a delicious cup at home and for regular brewers looking to refine their daily ritual, centers on a benchmark recipe of 15g beans, 240ml water, 92°C, and about 3 minutes (medium grind, 30-40 second bloom) as a starting point for systematic adjustments.
How to Brew French Press and Choose Beans | 4-Minute Recipe
French press is a brewing device with simpler steps than paper drip, yet it easily brings out the sweetness and body of the beans. It's especially well-suited for people who want to brew delicious coffee consistently even in the morning, or those who find pouring technique challenging.
Espresso Extraction Basics and Adjustment Techniques | Home Brewing Stability Guide
Home espresso becomes much more stable simply by establishing one baseline recipe first, rather than adding complex theory. This guide uses the fundamental 1:2 ratio recipe (e.g., 18g→36g, 25–30 seconds, 90–96°C) as a foundation, then walks you through which variables to adjust based on taste, getting you to reliable results the fastest way.